


There's never a more important time to pick up the sponge than during the winter months as a quick jaunt to the local shops can be enough to completely plaster your bike in grime and muck. You can almost get away with putting off cleaning your bike in the spring and summer months, but during winter? No way, especially if you're one for off-road adventuring or even the mud fest that is cyclocross. It's time to grab that sponge, fill a bucket and get cleaning.
Quick and easy
Bike cleans are feared the world over, but it doesn't have to take hours to get your bikes as clean as a whistle. In reality, it could only take ten to fifteen minutes out of your day, perhaps half an hour if you're dealing with a particularly dirty machine.
Before we jump into the step by step guide, what are you going to need in your arsenal of cleaning products? First of all, never underestimate the value of a workstand. Homemade or makeshift solutions are all very well, but to avoid damaging your bike and ensure you can get into every nook and cranny of the frame, a dedicated stand is an essential piece of kit.
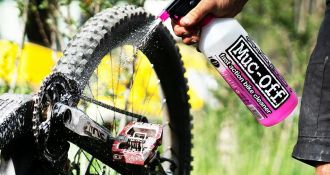
Next, it's the holy trinity - bike cleaner, degreaser and lube. To apply all these products, make sure you've got a soft sponge, a soft bristled brush (a toothbrush will often get the job done) and a proper gear brush to really dig into the drivetrain.
A step by step guide to bike cleaning
{:A7269,A3831,13007}
First, wipe the rims and brake pads, removing any excess debris that might have built up. It's then time to move onto the dreaded derailleurs and chainset - often the dirtiest parts of your bike. A standard bike cleaning spray is pretty useless here. Instead, you'll need a specialist degreasing agent to really get at the grime. Once you've sprayed the components - including cassette and chain - leave the degreaser for a couple of minutes to really work its magic. Once all the degreaser has worked its way in, it's time to attack the metal components with a soft bristle brush, ridding the all-important components of the dreaded corrosive grit and grime.
{:A7273,79815,A5235}
With this quick and easy cleaning tutorial, your bike should stay sparkling throughout the upcoming winter period. If you're eager to learn more, why not pop into the shop and pick the brains of our expert mechanics?